
Once upon a time on the internet, adding animation to your site was a cumbersome, somewhat specialized task. Divi, however, possesses powerful animation tools and scroll effects that you can implement without needing a lot of technical expertise. Anyone can add these effects to their sites with minimal effort. While this tutorial’s processes can be applied to any element within Divi, we are going to focus on sections and rows today to achieve specific effects using those. Let’s dig in with the animations!
Preview
Desktop
Mobile
Load the Divi Builder into a Page or Post
The first thing you will need to do is enter into the Divi Builder. Whether you choose one of our layout packs (we will be using the tennis club layout pack for this article) or a design of your own, all of the steps take place within the Section and Row settings.
With this design, we will be animating 1 section and 3 rows to achieve a sequential loading effect.
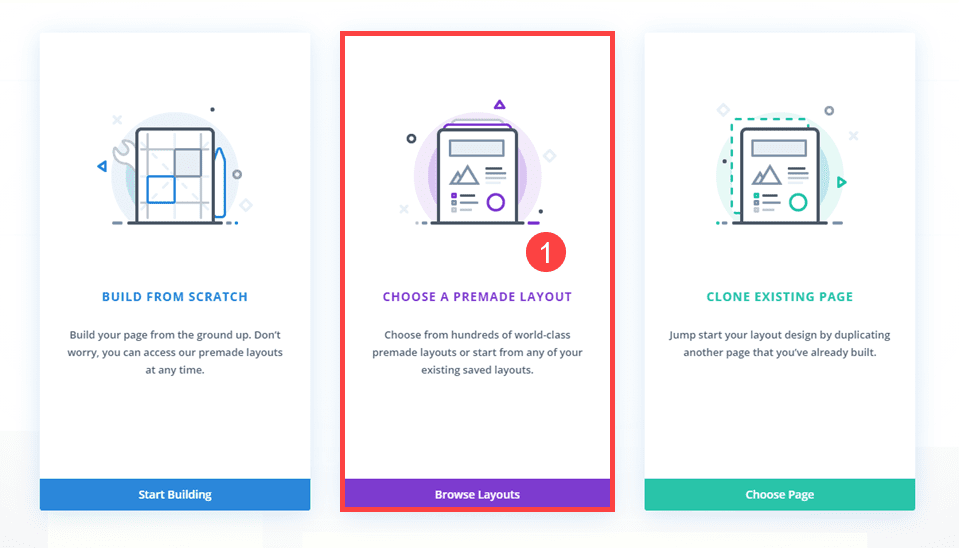
Choose a Premade Layout
To apply one of our professionally designed layout packs, enter the Divi Builder and select Use a Premade Layout. This will bring up the list of all the freebies we offer.
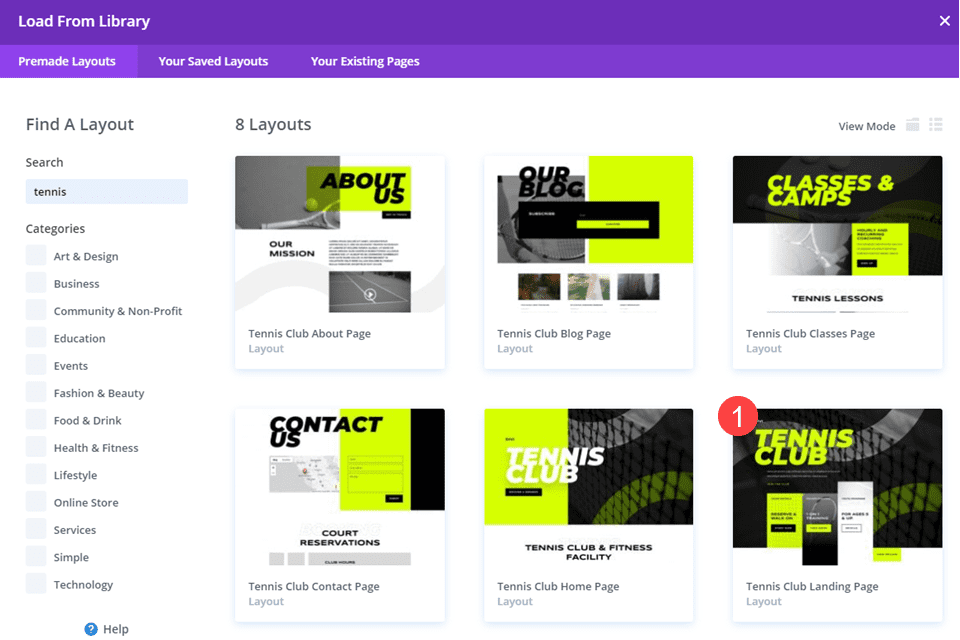
Pick a Layout
Next, simply choose which layout pack you want to use. You can sort by category or search for keywords to see what we have created for you.
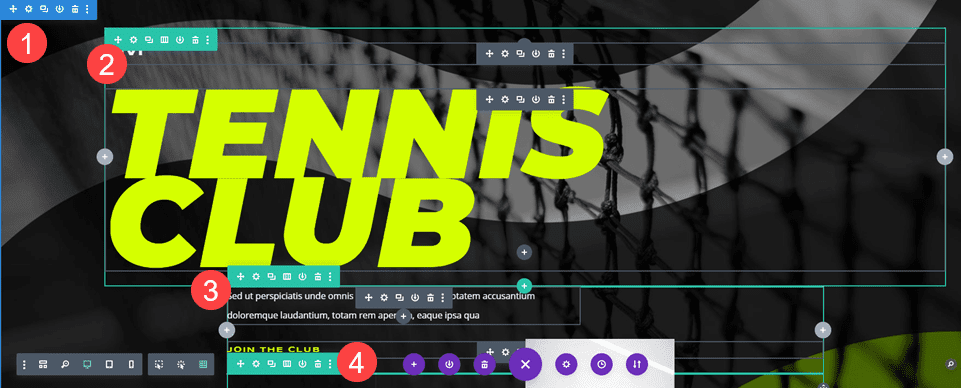
Locate the Section(s) and Row(s) to Animate
When the layout has imported all the assets and the page is loaded, you will want to find the section and row(s) to which you want to add animations. Remember, Sections are color-coded Blue in the Divi Builder, and Rows are Green.

With that mapped out, let’s get to adding those animations!
How to Add Animation to Sections and Rows – Option 1
Adding an animation to a Divi section is very simple. You first need to enter the Section settings. Then, navigate to the Design tab and scroll until you see the Animation options.
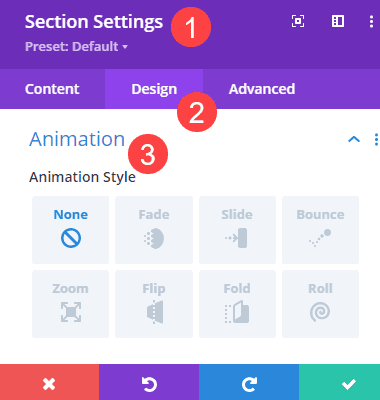
Under the Animation options, you will adjust up to 8 different options for your chosen animation.
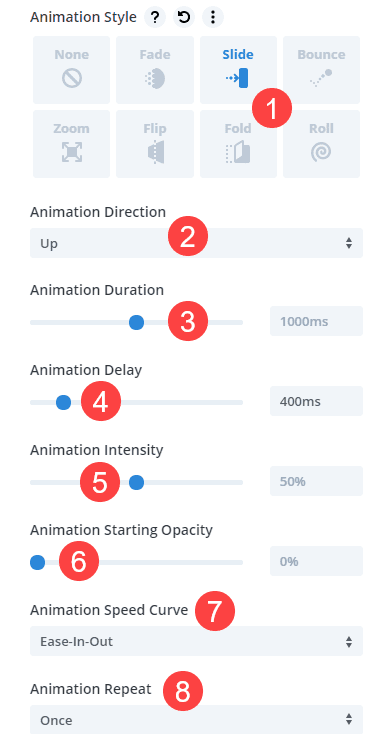
- Animation Styles is where you choose how the animation appears. If the section will roll end-over-end or bounce from the side of the page like a ball. Most common are Fade and Slide.
- Direction – You will set the direction the element moves toward. A value of up means the section will start at the bottom and move up. Up is not the point of origin.
- Duration – How long the animation lasts from start to finish. A lower value will speed it up, and a higher one will slow it down.
- Delay – This option prevents the animation from triggering when as soon as possible and can help call attention to it more than if it were to trigger immediately.
- Intensity – The lower the value, the smoother than animation, while higher values are snappier and more aggressive.
- Starting Opacity – A value of 0 will cause the animation to begin invisible and come into focus over the duration. 100 means that the element is fully visible even before the animation begins.
- Speed Curve – This will allow you to adjust how smoothly the animation begins and ends.
- Repeat – Is your animation a one-off effect, or is it something that you want to loop over and over again? If an animation is set to Once, the page must reload to initiate it again.
How to Add Animation to Sections and Rows – Option 2
Divi also has a feature called Scroll Effects. These are animations that trigger whenever the user scrolls their viewport to the element. Scroll effects can be set to any element, and can be combined with the Animation options we mentioned above.
How to Enable Scroll Effects
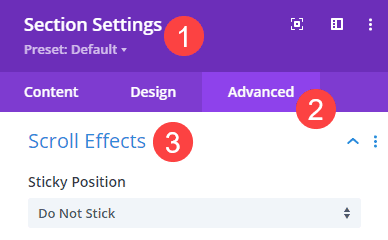
Again, any element in Divi can be set to have Scroll Effects enabled, but we are dealing with sections and rows today. So enter your Section settings, navigate to the Advanced tab, and find the Scroll Effects heading.
Choose the Effects and Triggers
Within the Scroll Effects options, you will find various tabs for different kinds of animations you can trigger on scroll.
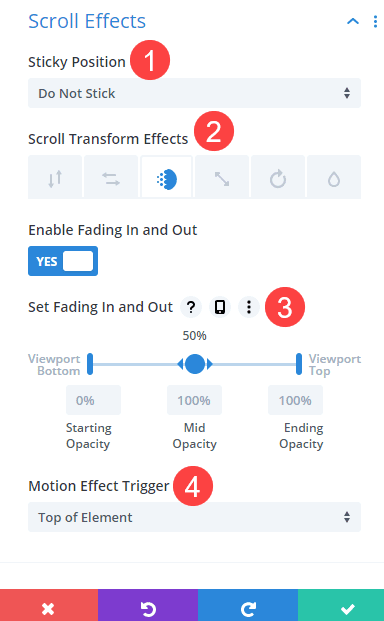
- Sticky Position – Whether or not the section or row sticks to the user’s screen as they scroll past.
- Transform Effects – These are the actual animation effects: horizontal and vertical movement, fade in/out, size scaling, rotation, and blurring.
- Set [Feature] – You will be able to set where the effect is most visible on screen and when/where it occurs
- Motion Effect Trigger – You will determine if the animation begins when the top of the element enters the viewport, the center of the element, or the bottom.
The primary difference in these versus using the Animation options in the previous section come down to whether you want the animation to be automated or if you want it to trigger each and every time the user performs an action. You can combine animations using the Scroll Effects and Animation options, which we will be using for the main tutorial’s effect.
Combining Animations for Sections and Rows
You can create some stunning effects for your sites by combining various animations to trigger at different times. By using the Animation Delay option, your site can animate a series of sections, rows, and elements in sequence to pull off some impressive visuals.
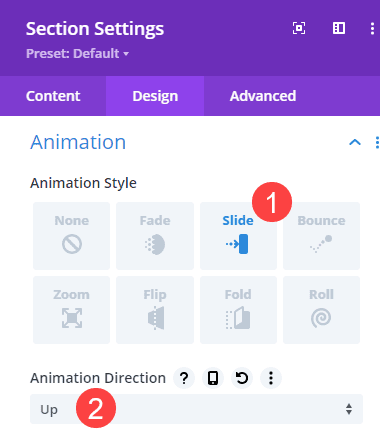
To begin with, we’re going to set the Animation Style in the Section settings to Slide with the Animation Direction set to Up.
We will keep the rest of the options at their defaults. Especially the Animation Delay. We want the Section to trigger when it’s in view.
Animation Settings for Row 1
Next, we will adjust the first row in the section. We go into the Row settings, go to the Animation options under the Design tab, and again select Slide. This time, we want to change the Direction to Down and the Animation Delay to 500ms. 1000ms is equal to 1 second, remember.
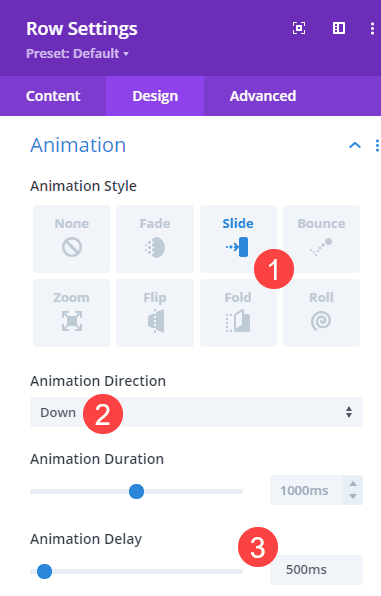
Since we left the Section timing at 0ms to trigger immediately, we want the row to be slightly offset, allowing the initial animation to mostly finish before this one begins.
Animation Settings for Row 2
Next, we’re going to go into the settings for the page’s second Row and go to the Animation options. Again, we will select Slide for the Animation Style, and this row will slide in toward the Right.
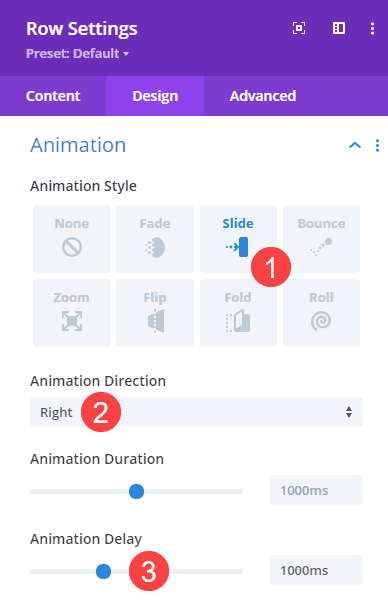
Additionally, we’re going to set the Animation Delay at 1000ms, meaning this one will trigger as soon as the first animation ends.
Animation Settings for Row 3
For the third row we’re animating, we’re going to use Scroll Effects to achieve our goals. Because our third row begins just above the fold, most animations would be unseen if we simply used a time delay as we did with the other elements. So we’re going to make it so that isn’t the case.
Animation Options
First off, we’re going to repeat the processes above. Only with this row, we are setting the Animation Style to Fade. Then, we will set the Duration to 500ms so this row appears more quickly during its animation. We will Delay it by 1500ms to ensure the other animations are fully complete before this begins.
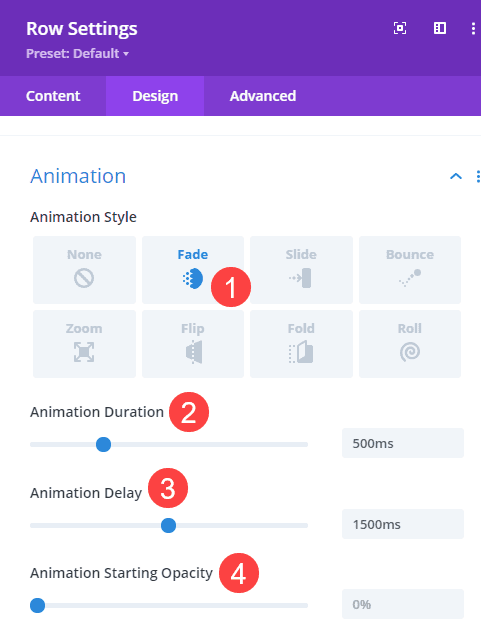
Finally, be sure to check that the Starting Opacity is set to 0%. We want this row to be invisible until it is ready to be seen.
Scroll Effects Settings
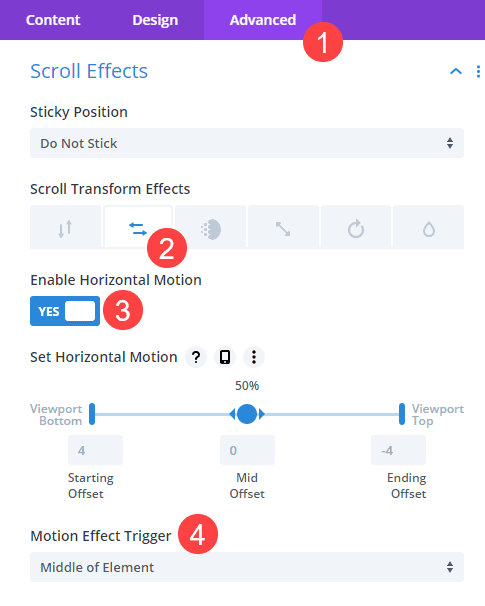
This is where things get fun because we get to combine effects. Click on the Advanced tab for the Row and find Scroll Effects. Find the Horizontal Motion tab and be sure to toggle it on. Then set the Motion Effect Trigger to Middle of Element. We are using the middle rather than the top to ensure that the effect doesn’t begin to take effect until the user scrolls, just in case the user’s viewport shows the top of the row.
With that set, the row will wait until everything else is finished animating to appear, and then when the user scrolls toward it, the entire row will appear to slide from the side of the screen.
Final Results
When you finish all of that, your results should be similar to this.
Desktop
Mobile
Conclusion
Adding animation effects is a surefire way to make your site more dynamic, more interesting, and more visually appealing. Using Divi’s built-in animation and scroll effects tools, you can create amazing combinations that will wow any visitor who happens to drop by.
What have you used the Divi animation effects to create out of your sections and rows? Let us see them in the comments!
Article featured image by Vectorchok / shutterstock.com
This is a ridiculous waste of user time
What about the google speed insight score
Do the animation could cause to limit the speed Google evaluation ?
Regards
It shouldn’t add enough load times to affect Google Page Speed Insights, but if you feel as though the page is getting too heavy, I’ve always found the On Scroll animations to be a little lighter weight in terms of loading than those that happen automatically.